


Understanding how to build a backyard koi pond can be a DIY project that transforms your outdoor space into a tranquil oasis.
Before starting your project, there are many factors that you should consider to ensure a successful and long-lasting koi pond.
So we put together this comprehensive guide to walk you through the essential steps of building a backyard koi pond. Starting from excavation to water quality management, we provide tips and recommendations along the way.
How to Build a Backyard Koi Pond: What to Consider Before Starting?
Before jumping into building a koi pond in your backyard, we suggest you consider the following:
- Available space: Koi ponds require a significant amount of space, so be sure to measure your yard before starting the project. A general rule of thumb is to have at least 1000 gallons of water for every inch of koi fish.
- Necessary equipment: Building a koi pond requires several pieces of equipment, including a pond liner, pump, filtration system, and water treatments. Make sure you have a budget in mind before starting the project.
- Level of maintenance: Koi ponds require regular maintenance, including water changes, cleaning filters, and monitoring water quality. Consider whether you have the time and resources to maintain a koi pond before starting the project.
- Climate: Koi fish require a specific water temperature range and may not survive extreme temperatures. Consider your climate before starting the project and plan accordingly.
By taking these factors into account, you can ensure that you are fully prepared to build and maintain a beautiful and healthy koi pond in your backyard.
What is the Average Cost for Building a Backyard Koi Pond?
The cost of building a backyard koi pond can vary greatly depending on the size, depth, features, and whether it’s a DIY project or professionally installed. Here are some average cost ranges from various sources:
According to HomeGuide, a koi pond costs $3,500 to $17,000 on average when installed, not including the fish. Koi pond kits cost $550 to $6,100. The annual maintenance costs range from $600 to $3,000.
Bob Vila states that the typical cost to build a koi pond ranges from $450 to $100,000, with a national average cost of $14,000.
Hepper suggests that an average koi pond will run you around $9,000 to build. This cost includes the liner, gravel, rocks, filters, and the labor in most cases.
Premier Ponds mentions that large koi ponds can start at around $20,000 and go as high as you want. They can start at about 15 by 20 feet wide, have a stream, and hold around 2,500 gallons of water.
Please note that these are just estimates and the actual cost can vary based on your specific requirements and local labor and material costs.
Do You Need a Permit?
Whether you need a permit to build a koi pond in your backyard can depend on several factors, including the size and depth of the pond, local regulations, and whether any electrical work is involved. Here are some general insights:
- According to Pond Academy, in most cases, you will not need a permit to build a small garden pond. However, if the pond is over a certain size (often 5,000 gallons or more), or if it’s considered a permanent structure, you may need a permit.
- Living Water Landscape Service suggests that if your pond will be larger than 10 feet in any direction or deeper than 2 feet, you may need a permit. Also, if you plan to install a permanent electrical system for a pump or lights, a permit will likely be required.
- The Spruce mentions that in some areas, any excavation deeper than 2 feet requires a permit.
It’s important to check with your local city or county building department to understand the specific regulations in your area. This will help you avoid any potential issues or fines.
How to Build a Backyard Koi Pond Step by Step
Now, building a backyard koi pond may seem like a daunting task, but breaking it down into manageable steps can make the process much easier.
Let’s start and guide you through each stage of the construction process.
Step 1 – Planning for Your Koi Pond
The planning stage is crucial in building a backyard koi pond. Here are some factors to consider:
Location: Choose a location that is visible and accessible from your home for easy maintenance and enjoyment. Avoid areas with heavy tree coverage to prevent leaves from falling into the pond and areas that are prone to flooding.
Size: The size of your pond will depend on the number of koi you plan to keep. As a general rule, a pond that is at least 1000 gallons and a depth of at least 3 feet is recommended for koi.
Shape: The shape of your pond can be designed according to your preference. It could be round, rectangular, or free-form. However, avoid sharp corners where debris can accumulate.
Sunlight Exposure: Koi ponds should have a balance of sunlight and shade. While sunlight helps with the growth of beneficial algae, too much can lead to excessive algae and overheated water.
Proximity to Utilities: Your pond should be within reach of electrical outlets for the pump, filter, and other equipment. Also, consider access to a water source for filling and maintaining the pond.
Safety: If there are children or pets in your household, safety measures should be considered, such as fencing or a sturdy pond cover.
Local Regulations: Check with local authorities for any regulations or permits required for building a pond in your backyard.

Step 2 – Designing Your Koi Pond
Next up is designing your koi pond. This step involves more detailed planning and visualization of how you want your pond to look and function. Here are some aspects to consider:
Depth and Shelves: Koi ponds should ideally be at least 3 feet deep to protect the koi from predators and to provide a cool area during hot weather. You might also want to include shelves at different depths for aquatic plants.
Bottom Slope: Design the pond bottom to slope towards a central area where you can place a bottom drain. This helps in removing waste and debris effectively.
Pond Edges: Consider how you want the edges of your pond to look. You might want a formal look with straight edges, or a more natural look with irregular, curved edges.
Filtration System Location: Plan where to place your filtration system. It should be easily accessible for maintenance but hidden from view for aesthetic purposes.
Waterfall or Stream: If you’re planning to include a waterfall or stream, consider its location and how it will circulate water in your pond.
Plant Zones: If you plan to have aquatic plants, designate areas in your pond where they will grow best. Some plants prefer shallow water, while others need deeper water.
Viewing Areas: Think about where you’ll be viewing your pond most often and design with that perspective in mind.
Lighting: If you plan to enjoy your pond during the evening, consider incorporating underwater lighting in your design.
Remember, a well-designed koi pond not only provides a healthy environment for your koi but also creates a visually appealing feature in your backyard.
You can even sketch out your design to help you visualize the end result. Ensure to make any necessary adjustments before you start digging.
Step 3 – Getting Materials and Equipment for Your Koi Pond
Gathering the necessary materials and equipment is a crucial step in building your koi pond. Here’s what you’ll typically need:
Pond Liner: This is what will hold the water in your pond. It needs to be durable and puncture-resistant. You can choose between a flexible liner (like EPDM) or a preformed liner.
Underlayment: This goes under your liner to protect it from sharp objects in the soil that could cause punctures. It can be a special pond underlayment fabric or even old carpeting in some cases.
Pump: The pump circulates water in your pond, helping to keep the water clean and oxygenated. You’ll need to choose a pump that can handle the volume of your pond.
Filter: A good filtration system is crucial for maintaining water quality. You’ll typically need both a mechanical filter (to remove solid debris) and a biological filter (to break down harmful waste products).
UV Sterilizer: This device uses ultraviolet light to kill algae and other microorganisms in the water, helping to keep your pond clear.
Aeration System: This could be a waterfall, fountain, or air pump. It adds oxygen to the water, which is crucial for your koi and beneficial bacteria.
Heater: Depending on your climate, you might need a pond heater to keep the water temperature stable during colder months.
Construction Tools: You’ll need various tools for the construction process, such as a shovel for digging, a utility knife for cutting the liner, and a level to make sure your pond edges are even.
Rocks and Gravel: These are used for lining the pond and creating a natural look. They also provide surface area for beneficial bacteria.
Plants: Aquatic plants add beauty to your pond and provide benefits like shade for your koi and oxygen production.
Fish Net: A net is useful for handling koi when you’re introducing them to the pond or need to check them for health issues.
Test Kit: A water test kit is crucial for monitoring water quality parameters like pH, ammonia, nitrite, and nitrate levels.
Remember, the specific materials and equipment you’ll need can vary depending on your pond’s design and your specific needs.
Always do your research and don’t hesitate to ask for advice from professionals or experienced pond keepers.
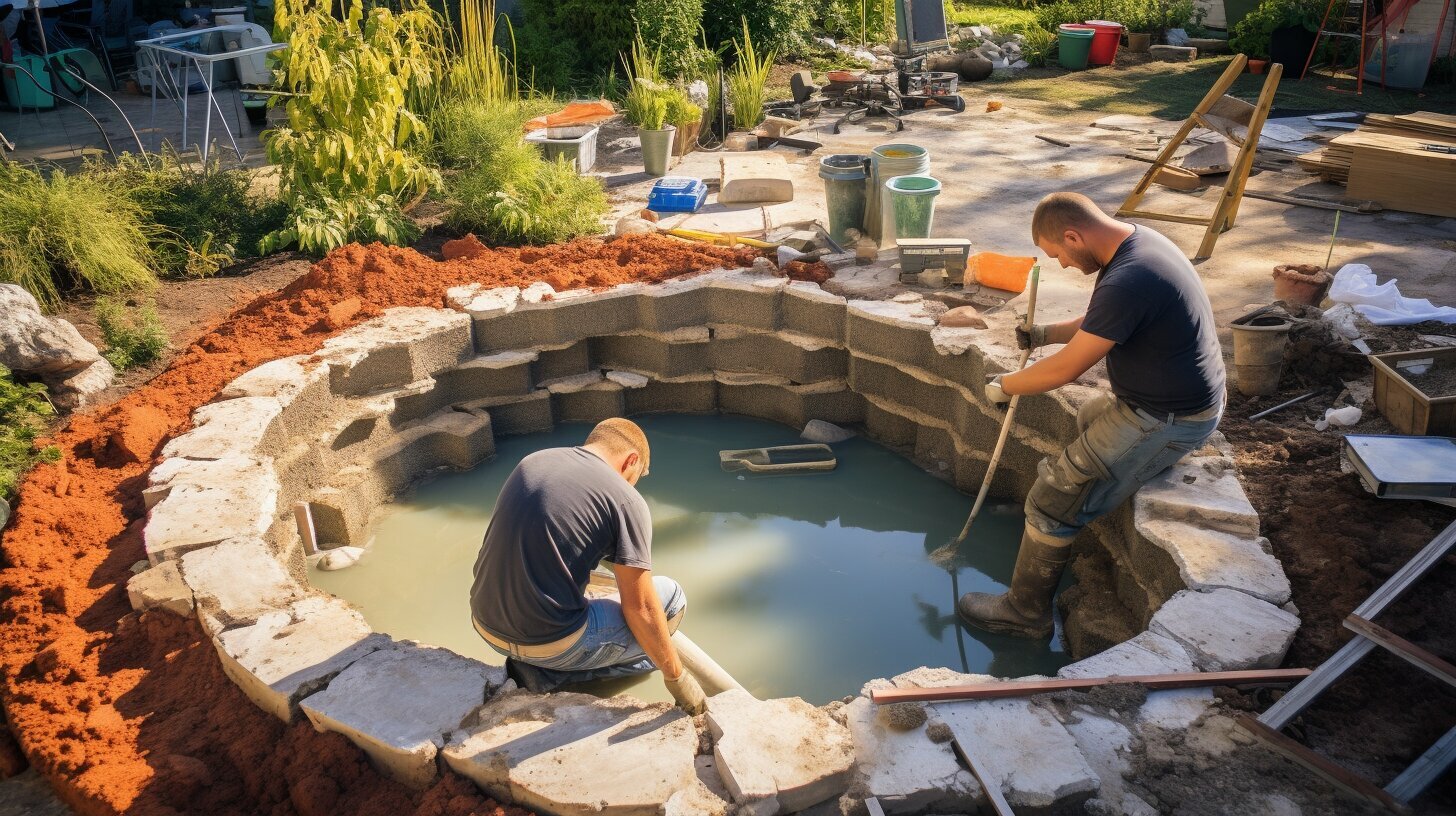
Step 4 – Excavating Your Koi Pond
Excavating your pond is one of the most labor-intensive parts of the process. Here’s how to go about it:
Mark the Outline: Use a rope or garden hose to mark the outline of your pond on the ground. This will serve as your guide while digging.
Start Digging: Using a shovel, start digging within the marked outline. Remember to follow your design plan, including different depths for different areas of the pond.
Create Shelves: If your design includes shelves for plants or shallow areas, make sure to dig these out at the appropriate levels.
Check for Sharp Objects: As you dig, remove any sharp rocks or roots that could potentially puncture your pond liner.
Level the Edges: Use a level to make sure the top edge of your pond is level all the way around. This is important for maintaining a consistent water level and creating a visually pleasing pond.
Dig a Trench for the Plumbing: If your design includes a bottom drain, you’ll need to dig a trench from the drain location to where your filtration system will be. This trench will house the plumbing that connects the drain to the filter.
Remember, safety is important during this step. If you’re digging a deep pond, be aware of the risk of the sides collapsing. It may be worth hiring professionals for this step if you’re not comfortable doing it yourself.
Step 5 – Installing the Underlayment and Liner
Installing the underlayment and liner is a critical step in ensuring the longevity of your koi pond. Here’s how to do it:
Spread the Underlayment: The underlayment acts as a cushion between the pond liner and the ground. It protects the liner from any sharp objects that could puncture it. Spread the underlayment across the excavated area, making sure it covers all surfaces.
Place the Liner: Place your pond liner over the underlayment. The liner should be large enough to cover the entire pond, with extra to overlap the edges. Make sure it conforms to the shape of the pond, including any shelves or steps you’ve dug out.
Smooth Out the Liner: As you place the liner, smooth out any wrinkles or folds as much as possible. This will make the pond look more natural once it’s filled with water.
Secure the Liner: Once the liner is in place, you can start to fill the pond with a little water to help hold the liner in place. As the pond fills, continue to adjust and smooth out the liner as needed.
Trim Excess Liner: After the pond is filled, you can trim off any excess liner. Leave enough to secure around the edges of the pond.
Remember, it’s important to take your time with this step. The liner is what keeps your pond from leaking, so it’s crucial to install it correctly. If the liner is punctured or not properly secured, it can lead to problems down the line.
Step 6 – Installing the Filtration and Aeration System
Setting up the filtration and aeration systems is crucial for maintaining a healthy environment in your koi pond. Here’s how to do it:
Choose the Right Filter: There are various types of filters available for koi ponds, including mechanical filters (which remove solid debris) and biological filters (which break down harmful waste products). Some systems combine both types. The size and type of filter you need will depend on the size of your pond and the number of fish.
Install the Filter: The filter should be installed according to the manufacturer’s instructions. Typically, it will be placed outside the pond, with hoses or pipes connecting it to the pond’s water system. The filter should be easily accessible for maintenance.
Install the Pump: The pump circulates water through the filter and back into the pond. It should be submersed in the pond or located externally, depending on the type. Make sure the pump’s capacity matches the volume of your pond and the requirements of your filter.
Set Up the Aeration System: Aeration can be provided by a waterfall, fountain, or air pump. It’s important for adding oxygen to the water, which is crucial for your koi and beneficial bacteria.
Connect the Plumbing: Connect the pump, filter, and any other components using the appropriate hoses or pipes. Make sure all connections are secure to prevent leaks.
Test the System: Once everything is installed, test the system to make sure water is flowing correctly through the pump and filter, and that the aeration system is working.
Remember, maintaining good water quality is one of the most important factors in keeping your koi healthy. The filtration and aeration systems play a crucial role in this, so it’s worth investing in good-quality equipment and installing it correctly.
Step 7 – Filling the Pond with Water
Filling your pond is a significant step in the process of building your koi pond. Here’s how to do it:
Start Filling: Begin filling your pond with water. Use a clean, uncontaminated source. As the pond fills, the water will help hold the liner in place.
Smooth Out the Liner: As the pond fills, continue to adjust and smooth out the liner as needed. This will help ensure that the liner fits snugly against the contours of the pond.
Check for Leaks: As the water level rises, keep an eye out for any signs of leaks. If you notice the water level dropping unexpectedly, you may need to check the liner and the edges of the pond for any areas where water might be escaping.
Dechlorinate the Water: If you’re using tap water to fill your pond, it’s likely to contain chlorine, which is harmful to fish and beneficial bacteria. Use a dechlorinating product to neutralize the chlorine before introducing any living organisms to the pond.
Check the Water Parameters: Use a water test kit to check the pH, ammonia, nitrite, and nitrate levels. The water should be properly balanced before you introduce any fish or plants.
Remember, the water in your pond is the environment in which your koi will live, so it’s important to ensure that it’s clean and safe. Always dechlorinate tap water and check the water parameters to ensure they’re suitable for koi.
Step 8 – Edge Treatment for Your Koi Pond
Finishing the edges of your pond is an important step that helps secure the liner and enhances the overall aesthetics of your pond. Here’s how to do it:
Trim the Liner: Once the pond is filled, you can trim off any excess liner. Leave enough to secure around the edges of the pond.
Choose Your Edge Material: The material you use to finish the edges of your pond can vary depending on your aesthetic preferences and the style of your garden. You might use large rocks or pebbles, paving stones, or even a wooden deck.
Place the Edge Material: Arrange your chosen edge material around the perimeter of the pond, making sure to cover the edge of the liner. This not only hides the liner but also helps to secure it in place.
Secure the Edges: Depending on the material you’re using, you might need to secure it in place with mortar, soil, or other means. Make sure it’s stable and won’t shift over time.
Blend with the Surrounding Landscape: Try to make the pond edges blend naturally with the surrounding landscape. You might add plants, mulch, or other landscaping elements around the edges of the pond.
Remember, the edge treatment not only adds to the visual appeal of your pond but also serves a practical purpose in securing the liner. Take your time with this step to ensure a beautiful and durable result.
Step 9 – Plants for Your Koi Pond
Adding plants to your pond provides numerous benefits, including improving water quality, providing shade for koi, and enhancing the pond’s natural beauty. Here’s how to do it:
Choose the Right Plants: Select a variety of aquatic plants that are suitable for your climate and the conditions in your pond. Some plants provide shade (like water lilies), some oxygenate the water (like hornwort), and some provide habitat for beneficial insects or fry (like reeds or rushes).
Prepare the Plants: Most aquatic plants need to be planted in special aquatic plant pots with aquatic plant soil. Regular garden soil contains nutrients that can cause algae blooms in your pond.
Position the Plants: Place the plants in the appropriate zones in your pond. Some plants prefer deep water, some prefer the shallows, and some prefer to be at the water’s edge. Make sure the plants are secure and won’t tip over.
Consider Floating Plants: Floating plants like water hyacinth or duckweed can provide quick cover and shade for your pond. However, be aware that some floating plants can quickly take over a pond and may need to be regularly thinned.
Monitor Plant Growth: Keep an eye on your plants as they grow. Some may need to be pruned or thinned to prevent them from taking over the pond. Also, watch for any signs of disease or pest problems.
Remember, while plants can provide many benefits for your pond, they also require care and maintenance. Choose plants that are suitable for your pond and your level of gardening expertise.

Step 10 – Adding Koi Fish
Introducing koi to your pond is an exciting step. Here’s how to do it properly:
Acclimate the Fish: Before adding the koi to your pond, you’ll need to acclimate them to the temperature and pH of your pond water. This is typically done by floating the bag of fish in the pond water for about 15 to 30 minutes.
Gradually Introduce Pond Water: After the temperature acclimation, gradually introduce some pond water into the bag of fish. This will help them adjust to the water chemistry of your pond.
Release the Fish: After the koi have had time to acclimate, gently release them into the pond. It’s best to do this in the morning or late afternoon, when the sun is not as strong.
Monitor the Fish: Keep a close eye on the koi for the first few days. Monitor their behavior and look for any signs of stress or disease.
When to Feed the Fish: Wait 24 hours after introducing the koi to your pond before feeding them. This gives them time to adjust to their new environment. Start with a small amount of food and gradually increase it as needed.
Remember, introducing koi to a new environment can be stressful for them, so it’s important to make the transition as smooth as possible. Always monitor new fish closely for any signs of illness or distress.
Step 11 – Establishing a Maintenance Routine
Establishing a maintenance routine is crucial to keep your koi pond healthy and beautiful. Here’s what you need to do:
Feeding the Fish: Feed your koi a balanced diet suitable for their size and the water temperature. Avoid overfeeding as it can lead to poor water quality.
Cleaning the Filter: Regularly clean out your pond filter according to the manufacturer’s instructions to ensure it operates efficiently.
Checking Water Quality: Use a water test kit to regularly check the pH, ammonia, nitrite, and nitrate levels in your pond. Imbalances can harm your koi and other pond life.
Performing Health Checks on the Koi: Regularly observe your koi for any signs of illness or stress, such as changes in eating habits, unusual swimming patterns, or visible spots or wounds.
Removing Debris: Regularly remove fallen leaves, dead plants, and other debris from your pond to prevent them from decomposing in the water and affecting water quality.
Checking Equipment: Regularly check all pond equipment (pump, filter, UV sterilizer, heater, etc.) to ensure they are working properly.
Winterizing: If you live in a colder climate, take steps to winterize your pond, such as installing a pond heater or de-icer, and switching to a winter diet for your koi.
Remember, regular maintenance is key to preventing problems before they become serious.
A well-maintained koi pond will provide a healthy environment for your fish and a beautiful feature for your backyard.

Best Places to Buy Accessories for Your Koi Pond
When it comes to building a backyard koi pond, having the right accessories is essential.
From pond liners to pumps and filters, choosing high-quality equipment is crucial for creating and maintaining a healthy and beautiful pond. Here are some of the best places to buy accessories for your koi pond:
| Retailer | Online/In-store | Product Selection |
|---|---|---|
| The Pond Guy | Online | Pond liners, pumps, filters, water treatments, fish food, and more. |
| Tricker’s Pond | Online/In-store | Pond plants, pond liners, fish food, pumps, filters, and more. |
| Amazon | Online | Pond liners, pumps, filters, water treatments, fish food, and more. |
Note: It’s important to buy from a reputable and reliable supplier to ensure the quality of the accessories. Check customer reviews and ratings before making a purchase.
These retailers offer a wide range of high-quality products that are essential for building and maintaining a beautiful koi pond.
Whether you are looking for pond liners, pumps, filters, or water treatments, these retailers have everything you need to create a tranquil oasis in your backyard.

Will a Koi Pond Increase the Value of My Home?
The impact of a backyard koi pond on the value of your home can vary. Here are some perspectives and information we found:
According to Next Day Koi, koi ponds are a niche addition and may not necessarily increase the home’s resale value like a third bathroom or other home additions might.
Backyardway suggests that adding a pond to your backyard can increase the value of your property, especially if it’s near or features any body of water.
Gold Koi Fish states that many people believe that koi ponds can raise the property value of a home. It largely depends on the specific property, location, and layout of the house. However, generally speaking, fish ponds can add value to a house if they are well maintained and feature healthy fish populations.
In summary, a well-maintained koi pond can potentially increase the value of your property, but it largely depends on various factors such as the specific property, location, and the preferences of potential buyers.
Final Words
Building a backyard koi pond requires careful planning and the right accessories. By choosing high-quality equipment and supplies from reputable retailers, you can create a beautiful and healthy pond that will provide you with years of enjoyment.
Frequently Asked Questions on How to Build a Backyard Koi Pond
If you’re thinking of building a backyard koi pond, you might have a lot of questions. Here are some answers to frequently asked questions about constructing and maintaining a koi pond:
Are koi ponds expensive to build?
The cost of building a koi pond varies depending on the size and complexity of the design. A small, basic koi pond can cost a few hundred dollars, while a larger, more complex one can cost several thousand dollars. However, the investment is worth it, as a koi pond can last for many years and provide a tranquil oasis in your backyard.
Can you build an above-ground koi pond?
Yes, it is possible to build an above-ground koi pond. They can be constructed using a variety of materials, such as wood, plastic, or metal. Above-ground ponds can be more accessible and easier to maintain, but they may not fit in with the aesthetics of your backyard as well as an in-ground pond.
Can a koi pond have a viewing window?
Yes, it is possible to install a viewing window in a koi pond. This can be a wonderful addition to the pond, allowing you to view your fish up close and personal. However, a viewing window can be expensive and requires a specialized installation process, so it’s important to plan and budget accordingly.
Can you use blocks to build a koi pond?
Absolutely!! Having blocks can be used to build a koi pond. Concrete blocks are a popular choice, as they are durable and provide a solid foundation for the pond. However, it’s important to use blocks that are specifically designed for pond construction and to use a high-quality sealant to prevent leaks.
How many koi should you get for your pond?
The number of koi you should have depends on the size of your pond. As a general rule, there should be no more than one inch of fish per ten gallons of water. This means that a 1,000-gallon pond can support up to ten 10-inch koi fish. It’s important not to overcrowd your pond, as this can lead to health problems for the fish and poor water quality.

Thanks for reading our comprehensive guide on how to build a backyard koi pond. Drop us a comment letting us know if you have built a koi pond in the past or what plans you have to build one and why.